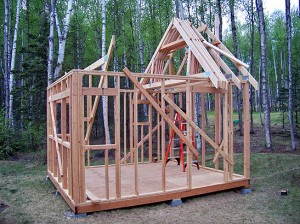
For those individuals who need to know how to build a roof truss for a shed, the great thing is that it’s fairly easy to do. The most important thing is purchasing quality materials and knowing the number of trusses you need to build. Once the shed and trusses are finished, they’re placed on top of the shed frame and the construction continues until finished. Before building a shed roof, it’s important to consider all safety measures and ensure that all your materials are present in order to build.
Choosing a Shed Roof Design

There are several different types of shed roof design that can be used for your shed. The most common is the gable roof design, which is versatile and works for most types of shed uses. The angle of a gable roof can vary from 20 degrees to up to 70 degrees, depending upon the needs of the individual. A hip roof shed is similar to a gable roof, except it has four sloping sides rather than two. A gambrel roof is significantly harder to build, though it’s more decorative and is a good option for those who are creating a pole barn for animals. The salt box roof shed is another difficult one, with one eave a lot lower than the other.
Deciding on What Type of Wood to Use for Trusses
It’s important to select a good, strong wood for your shed roof trusses. You’ll need something that is strong but easy to work with when it comes to building. One of the most popular choices for wood when it comes to trusses is southern yellow pine, although there are many varieties that can be used. Research should be done regarding the best type of material to use for the shed you’re creating. It’s also important to determine what to cover the roof in. Composite or asphalt shingles are some of the most common, while corrugated metal or plastic are also often used. Individuals can also use cedar shingles or the same finish as their house to keep the buildings on the property uniform.
Obtaining Measurements
The first thing you need to do when building a shed roof is to take measurements. You’ll need the measurements for the slope of the roof, or the angle at which the roof slopes. The slope measurement will be the length of the rafters, so if the roof is asymmetrical and one side has a longer slope, one of the rafters will have to accommodate that. It’s important to determine the number of roof trusses that will be required for your shed, and then double that number in order to find out how many rafters you will need in order to assemble the trusses. If you’re using a DIY kit, then these measurements and steps should have already been done for you.
Shed Roof Ventilation
Another thing that should be considered is shed roof ventilation. Many people add vents in order to eliminate condensation problems. Condensation can create many different problems, including leaving an opening for rust to invade the new shed and cause all types of problems. Vents are often added to both the front and rear gables, which allows the air to circulate through the rooftop. There are numerous types of shed roof vents, including slatted vents, screened vents designed to prevent insect access, and decorative vents. The specific type of vent chosen can add character and charm to a shed roof. Many pole barn plans and DIY shed plans include options for decorative roof vents.
Considering the Climate
Shed roofs need to be created to suit the climate they will reside in. For instance, a shed that exists in an area where it snows should feature a roof sloped enough to allow the snow shedding. The snow will accumulate easily on a roof that has a pitch of 14 degrees or less, so a larger pitch should be created to allow the snow to fall off easily. For sheds that will reside in rainy areas, a rust-proof finish should be used to help reduce the risk of rust and subsequent damage such as cracking or chipping.
Shed Roof DIY Kits
Another option that individuals have when building sheds is to purchase a DIY kit. These kits are available and contain all the materials needed to create the shed as well as the shed roof, so there’s no reason to ask how to build a roof truss for a shed or how to create the right slope. The kits come in many different styles and designs so it’s easy to find the perfect shed for your needs, your property, and your individual tastes. Even when choosing a shed DIY kit, it’s important to select a quality kit that contains quality materials and will be durable and long-lasting. A guarantee on the materials should be available, so it’s important to check whether one exists or not before purchasing.
Safety
There are many safety precautions that should be taken into consideration while building a shed roof. Make sure you have all the safety equipment you need before you get started; a hard hat, goggles, and gloves are a good start. In addition, make sure you know the proper procedures to use all the tools that will be involved in the project. Even with a shed DIY kit, there are dangers involved and it’s best to be meticulous about safety to prevent minor injuries or potentially life threatening injuries if an accident should occur.
By considering all of the aspects of building a shed roof above, you can ensure that the shed and the shed roof is built specifically for your needs and desires, and that it will suit them wonderfully. It’s important to do your research before getting started and to make sure you’re prepared in every way before getting started. Precaution and safety measures will go a long way toward ensuring that your shed roof is wonderfully built and that you’re protected and safe while creating it.
